What is a table saw?
Before describing what a table saw is, we should figure out what a saw is. A saw is a thin serrated blade that is typically used to cut wood. There are different types of saws available on the market like the circular saw, miter saw, band saw, pole saw, chainsaw, jigsaw, etc. They can be both mechanical and manual. A table saw is simply a saw that is attached to a table.
A table saw is a circular shaped saw that has been framed under a table surface. A part of the blade is protruding above the table. The exposed portion of the blade is able to cut wood.
The table saw is designed to help you accurately measure and cut wood at different angles and measurements with the least amount of effort given.
When appropriately used, the table saw can offer accuracy with consistency ensuring that every piece of wood that you cut fits its measurements perfectly. The table saw can be used to cut angles, especially right angles with precision. However, as mentioned above, to do so, you need to be able to wield the table saw correctly. This article is your complete guide on how to cut angles on a table saw.
How to cut angles on a table saw?
Before you cut any angles on your table saw you need to able to set your wood at the proper angle on the table. You can do this with three simple steps.
Things you will need:
- A first-class framing square
- A measuring tape/ ruler
- Sharp pencil
- Drafting triangle
- For best possible precision you may use a magnifying glass
Step 1:
- Use a drafting triangle or a framing square to precisely measure out and mark the angles and length of your cut.
Step 2:
- You might have the question- how do you use the drafting triangle to measure and mark out the angle? Well, you simply place the miter gauge against the flat edge of the drafting triangle. The miter gauge is like a protractor. It has a handle that allows you to grip the piece of wood you are cutting at different angles. Hold the flat edge of the miter gauge against the drafting triangle.
Step 3:
- The next step is to actually set the angle you want to cut the wood at. You can move the miter gauge left and right while making sure to hold the wood, gauge, and drafting triangle tightly against each other. The meter gauge’s handle will move to point at one of its many angle markings as you move the triangle. Keep turning till the handle indicates the angle you desire. Then simply turn the handle clockwise to lock that angle down.
Setting a specific angle can be slightly tricky at times. Don’t lose patience and move the handle back and forth till you get your required angle. The procedure for cutting 90-degrees is a little different and has been explained later in the article.
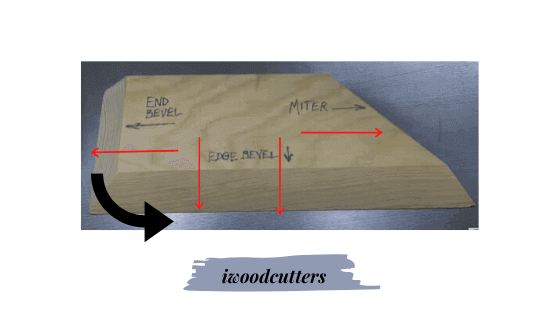
Cutting bevels or long cuts on a table saw can be a bit more complicated. Therefore for this, you must use a taper jig instead of a miter gauge because it’s safer and will keep your hands away from the blade. Place the jig away from the side you are making cuts on. Use the taper jig to mark points of the correct angle on the wood. Then connect points using a ruler and simply follow the lines on the saw.
If your table saw does not have a built-in fence, then attach a long piece of wood to your taper jig or miter gauge with a screw to use as a fence. Make sure the fence is appropriately secured and does not budge. The fence is a safety feature that allows you to hold the piece of wood in place as you cut it. This way, you can prevent the wood from sliding and be precise about your measurements.
Now various angles can be precisely cut using a table saw. However, cutting wood in 45-degrees and 90-degrees can be especially complicated if you do not know the correct way to do it. Therefore we will be providing you with the steps required to cut right angles and 45-degree angles correctly on a table saw.

How to cut a right angle on a table saw
The table saw is the perfect tool to quickly and efficiently cut a right angle (90- degree cut). Here is how you do it correctly.
Most table saws come with angle indicators to help you cut various angles on it. However, if your aim is precision, then depending on just the built-in angle indicators is not a good idea. It is recommended you use a drafting triangle instead. A 45-degree drafting triangle is preferable.
It is time to now follow the following steps to get a perfect looking right angle cut with your table saw.
Step 1:
- Create the perfect right angle between the miter gauge and blade by placing one 90-degree side along with the miter gauge and aligning it with the other 90- degree side.
Step 2:
- After adjusting the miter gauge, the next step is to choose a board for an extension fence. While a 1 x 2 board is recommended, you may use something longer depending on your needs.
Step 3
- The last set up step is to attach the fence to the miter gauge using a screw with a few inches of the fence board protruding.
Then place the piece of wood you intend to cut against the fence and push it through the saw to cut.
How to cut 45- degree angles on a table saw
Use a 45- degree drafting triangle to cut your 45-degree angle. Place the angled side against the miter gauge and the right-angled side against the blade. The miter gauge will now indicate to 45-degrees.
Then as mentioned above, place the piece of wood you intend to cut against the fence and push it through the saw to cut.
Safety Precautions and Tips
- Always keep your saw unplugged when setting up and when it is not in use.
- Never forget to don safety goggles to prevent any wood debris from getting into your eyes.
- A pair of earplugs will protect your ears from the loud and noisy saw.
- Make sure to correctly ventilate your workroom before you start sawing. Open a window or turn on the ventilation fan, if you have any.
- Ensure that the safety guards are aligned with the blade.
- Never use the rip cut fence as your guide when cutting a piece of wood to a certain length. There is a kickback hazard.
- Do a few test cuts on extra scrap pieces of wood before you move on to the actual piece.
- For a 45-degree cut, a good test would be to cut two pieces of wood in 45-degree angles, then holding them together. This is how you can test the accuracy and precision of your cuts on the table saw.
- Always ensure a 15 cm distance between your hand and the saw to avoid accidents.
- Make sure the miter gauge is out of the way before you start cutting.
- To avoid kickbacks, always stand beside the piece of wood you are cutting. Do not even stand behind the wood.
- Push the board towards the saw to cut it.
Conclusion
Cutting various angles on a table saw is an absolute breeze once you get the hang of the initial set-up steps. You will be able to cut wood at multiple lengths and angles with high accuracy and ease. Always keep the safety precautions and tips mentioned above in mind to avoid any form of mishaps and accidents. The table saw is a versatile tool that allows you to create diversely with wood. Now that you know how to cut angles on a table saw, you need to remember the steps and practice, and you will be a pro in no time!
Relevant Pages :

This is me Sonnet. I manage a full-time workshop for my clients’ woodworking projects. From a very young age, I’ve been always passionate about DIY projects. And that’s the reason I’m amicable with the woodworking tools. I’m regularly handling a couple of projects like cabinets, furniture, boats, and many more using wood, veneers, and laminates.