As a newbie or a curious hobbyist, you may want to know about what is a Plunge Router. So, that you can know about the things you need to use it for. Also, know about the ways you can work with it.
A Plunge Router or a Wood router is a powerful machine you use for wood designs and projects. You can cut, crop, engrave, drill a grove bit, make recess, and screw a tenon into the wood frame you will work with.
By using a plunge router you can create designs and adjustments on the wooden furniture or the wood base you have on the process. To create a fantastic workpiece for yourself or the customer.
Now, we know about the plunge wood router. Let us know about the basic knowledge of how a plunge router works and the methods to set it up neatly.
How Does a Plunge Router work? – Set Up and Functions of Your Plunge Router
For a woodworker, you have to work with different woods and frames to make a lot of creations.
You can also get help with it for household chores. Such as, you can adjust your table edges, make a hole in the plywood to stick it in with something, make creative wooden plaything, or other things.
That is why you need to have the thorough and proper information and knowledge about the work process of your plunge router.
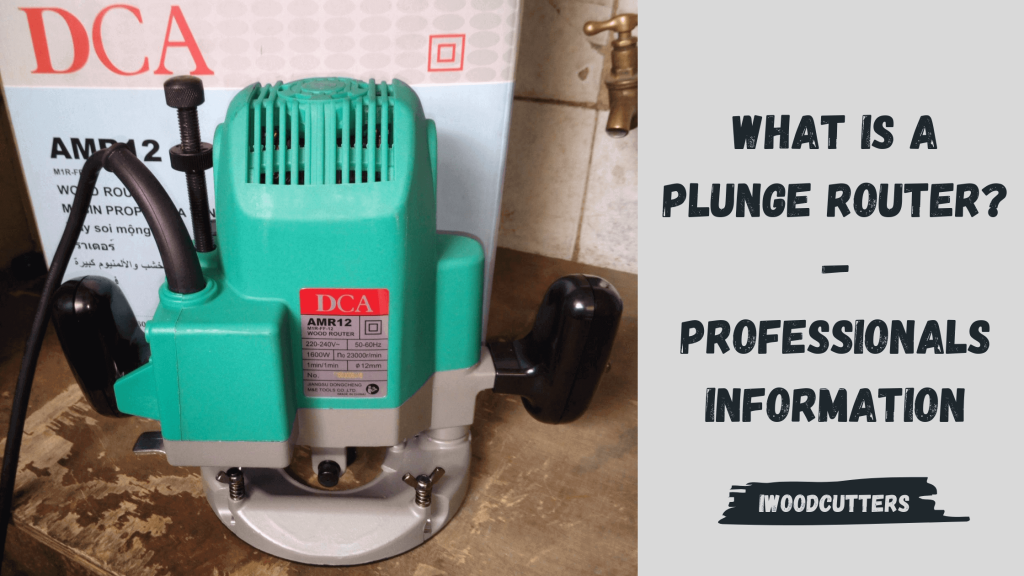
- The plunge router is called Plunge as this machine can plunge through the base wood with the cutter bit inside it.
- A wooden router can plunge into the wood frame through the base plate beneath the router machine. Which puts the groove or grove bit in the wood frame and pushes down to carve or engrave.
- There are two handles on the two sides of the plunge router. With the handles, you move the machine, change positions, push the bits into the wood, or pull out
- The on-off mechanism switch is on the right handle of the plunge router. When you pull up the button it turns on. If you push it down, the router gets off. Well, there is a sign in the button for you to understand easily.
- You will find a speed manage adjustment rotator on the near top of the machine. You have to rotate it left and right to change the speed. Moreover, when you work with different types of bits. You have to adjust the speed to get a fluent work result or to do it efficiently.
- Near the left handle of the router, you will have the depth adjustment regulator to accommodate the deepness of the bits in the wood piece. First, you need to unlock the depth lever and push the bits down into the wood. Then you can roll the depth adjustment switch downwards to lock the depth you prefer.
- Now, to change the bit or to put it into the plunge router. The place where you put the bit is the collet. To input a bit into the router, glide the base of the bit inside the collet. Then put out the tiny bit inside it, and pull back out more than half an inch of the bit from the collet.
- After that, rotate the movable part to tighten it. When it becomes tight enough the shaft of the collet or the router will start to move. That time you can stop and switch the button that is near the collet.
- To tighten the bit into the collet properly you need a wrench tool. As you need a perfectly tight bit. Or it may slip out and cause damage when you work with the router at a massive speed.
How to Work With the Plunge Router?- Step by Step Guideline
Since you know the switches and functions of the plunge router. Also, you know how to set up a bit into the collet of the router. You are ready to make cuts, carves, and engraves in your wood board.
- The prime thing you need to have on to your wood piece is that. The board must be a smooth base and parallel firmly. So, you can design smoothly.
- Now place the board in the table and lock it in the same state with bench lockers.
- As the lock place is proper. Again you have to check on the depth of the bit in the plunge router.
- Therefore, so that everything is ready and in its place. Connect the router plug up with the electric plug.
- Before you start the machine, wear safety precautions goggles. AS a lot of wood chips and dust fly around there when you work with it. It can also harm your eyes.
- Now, adjust the machine speed according to the bit nature. Then switch on the router and do your wood route work and projects.
- Thereby, once it is complete. You will have a neat and nice route wood board with a decent style of your choice.
- Also, when you use your router. As the movement of the bit is clockwise. You start from the right and go towards the left as the bit rotates.
- Finally, take out the power cord and repeat the process when you do the work.
At last, you know it all. The decent amount of information that you will give you necessary heads on as you make, create, and design.
Final Conclusion:
The plunge router work is very enjoyable and not at all very hard. Whether you a noon beginner or a passionate hobbyist.
You need to look out for the basic knowledge of the plunge router and know the way it operates.
With the proper knowledge and information, you can do your passionate projects. Also, do your job with remarkable efficiency.
Thus, you can keep up to learn and know more ways and methods. As you go on and work with the plunge router further.
Relevant Pages:

This is me Sonnet. I manage a full-time workshop for my clients’ woodworking projects. From a very young age, I’ve been always passionate about DIY projects. And that’s the reason I’m amicable with the woodworking tools. I’m regularly handling a couple of projects like cabinets, furniture, boats, and many more using wood, veneers, and laminates.